| Quantity: | Inspection Level: | Sample Size: |
| Quantity: | Inspection Level: | Sample Size: |
| CRITICAL defects | MAJOR defects | MINOR defects |
| Select AQL: | Select AQL: | Select AQL: |
| Select AQL: | Select AQL: | Select AQL: |
| Accept Point: 0 | Accept Point: 0 | Accept Point: 0 |
| Reject Point: 0 | Reject Point: 0 | Reject Point: 0 |
How is AQL applied in practice?
For importers, the goal is always to receive defect-free products. However, in reality, minor defects are often unavoidable. This is where AQL (Acceptance Quality Limit) comes in—it helps define an acceptable level of quality, allowing importers to manage quality control effectively and reduce the risk of receiving unacceptable shipments.
If the number of defects in a shipment exceeds the agreed AQL limit, the batch may fail inspection and require corrective action. In contrast, defects that are far beyond acceptable limits fall under the Rejectable Quality Limit (RQL)—meaning the batch is considered unsatisfactory and likely to be rejected.
AQL standards vary by industry. High-risk industries such as healthcare, medical devices, and aerospace often require stricter limits to ensure safety and compliance, while consumer goods may follow more flexible standards. Importers and suppliers typically agree on AQL levels based on product type, market requirements, and defect severity.
Once an AQL standard is agreed upon, it serves as a reference during pre-shipment inspections to determine the acceptable number of defects for each defect category.

Critical Defects (AQL: 0.0)
Critical defects are the most severe and entirely unacceptable in AQL inspections. They pose safety risks, violate regulations, or cause serious brand damage. Due to their critical nature, the AQL for such defects is always set at 0, meaning even one occurrence results in a failed inspection.
Criteria for defining a critical defect:
- Creates safety risks for users
- Violates legal or regulatory requirements
- Could result in recalls or major brand damage
Example of critical defects:
- Sharp edges or points that pose an injury risk
- Rust or contamination on food-contact products
- Missing or incorrect legally required safety labels
- Electrical insulation failure causing shocks

Major Defects (Common AQL: 2.5)
Major defects significantly impact product function, usability, or durability. While not as severe as critical defects, they can lead to customer complaints, returns, or dissatisfaction. The AQL for major defects is commonly set at 2.5, allowing a limited number of defects within an acceptable range.
Criteria for defining a major defect:
- Affects product function, durability, or usability
- Fails to meet agreed specs or industry standards
- May cause product rejection or complaints
Example of major defects:
- Products that cannot be assembled properly
- Skipped stitches in garments that affect durability
- Electronic items that fail to reach the rated voltage
- Incorrect components used, like a wrong LED bulb

Minor Defects (Common AQL: 4.0)
Minor defects are small imperfections that do not affect the product’s core function. These defects are usually tolerable, but excessive quantities may still lead to inspection failure. The AQL for minor defects is typically set at 4.0, providing a reasonable tolerance for cosmetic flaws.
Criteria for defining a minor defect:
- Does not impact product function or intended use
- Small cosmetic flaws that are barely noticeable
- Unlikely to cause returns or complaints
Example of minor defects:
- Light stains or dirt marks on a product
- Untrimmed thread ends in textiles
- Minor paint inconsistencies or visible glue marks
- Slight scratches or scuff marks on the surface
What is AQL inspection?
AQL inspection is a sampling-based quality control process used to determine whether the defect levels in a shipment fall within acceptable limits. Instead of inspecting 100% of the products, a predefined sample size is selected randomly from the batch. The number of defects found in the sample is then compared to the acceptance limits defined in the AQL table.
For large orders, the best practice is to select samples from different production batches over multiple production runs, ensuring a more comprehensive quality assessment. The results of the AQL inspection determine whether the shipment passes or fails, guiding decisions on whether to accept, reject, or rework the batch.
After completing the AQL inspection, a shipment inspection report is issued, documenting the findings. If the shipment passes, this report serves as evidence that the quality level meets the agreed standards.
What is the AQL table?
The AQL table (also known as the Acceptable Quality Limit table) is a standardized reference used in quality control inspections to determine:
- How many units to inspect (sample size)
- The maximum number of defects allowed before the batch fails
The AQL table is based on ANSI ASQ Z1.4 (ISO 2859-1) standards and consists of two sections:
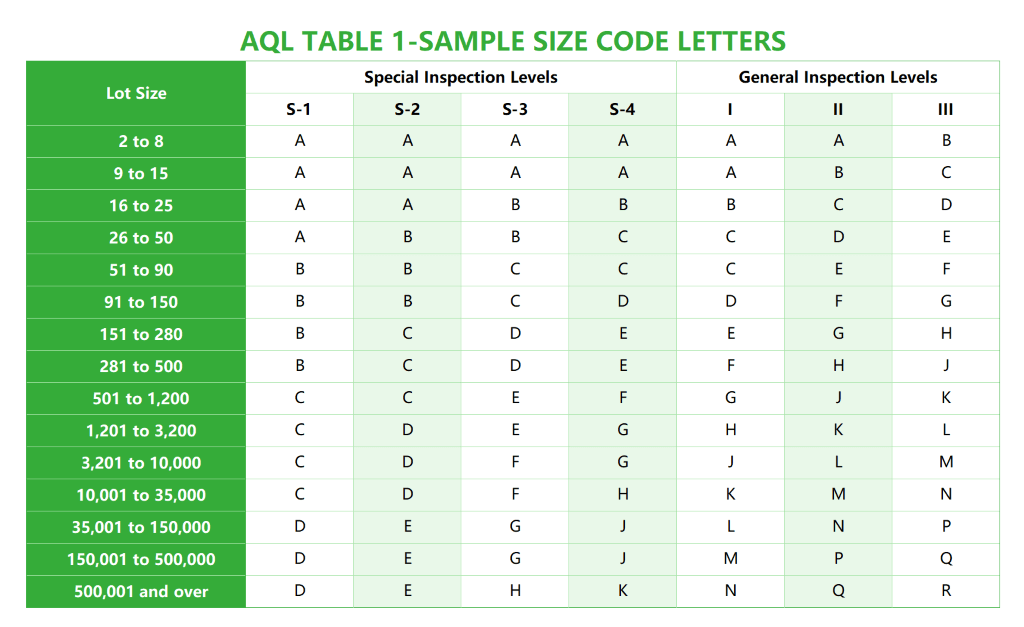
First Table: Sample Size Code Letters
● The first table helps determine a code letter based on the lot size and the selected inspection level.
● The inspection level determines how many units will be checked.
● Example: If your lot size is between 1,201 and 3,200 units, and you select General Inspection Level II, the corresponding code letter is “K”.
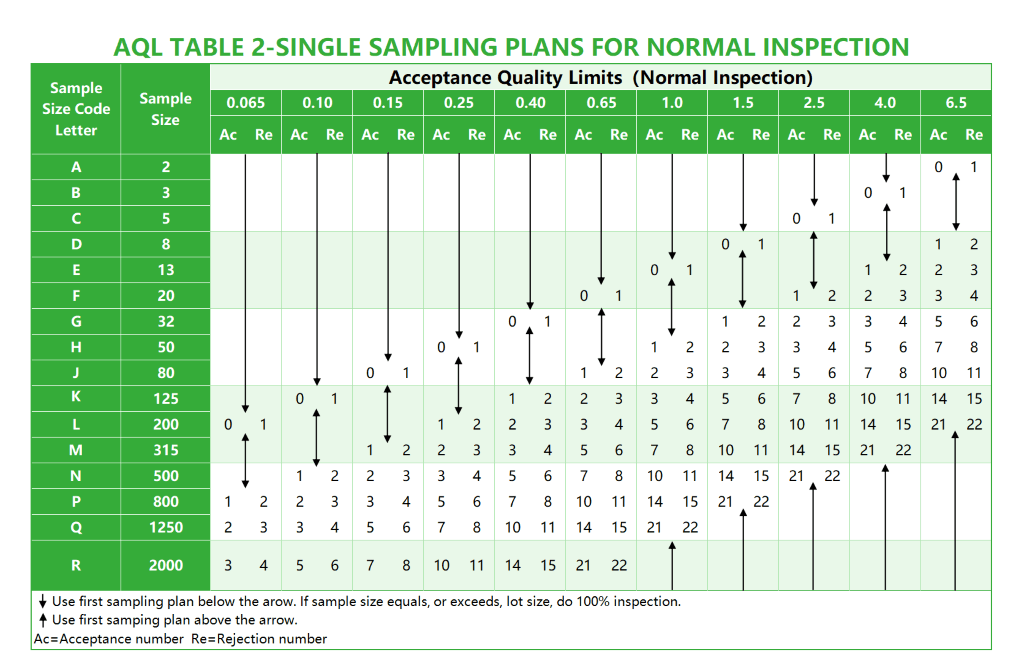
Second Table: Acceptance & Rejection Criteria
● The second table maps each code letter to a sample size and provides acceptance limits based on different AQL values.
● Example: If the code letter is “K”, the sample size is 125 units.
● If the AQL is 2.5 for major defects, the acceptance number is 7, meaning the batch will pass if 7 or fewer major defects are found.
● If the number of major defects is 8 or more, the batch fails inspection.
How to read the AQL table?
Reading and using an AQL table involves five key steps:
Step 1: Determine the Lot Size
● Identify the total number of units in the production batch.
● Find the corresponding lot size range in the first AQL table.
Step 2: Select the Inspection Level
● Choose the General Inspection Level (I, II, III) or Special Inspection Level (S-1 to S-4).
● General Inspection Level II is the most commonly used standard.
Step 3: Find the Sample Size Code Letter
● Cross-reference the lot size with the inspection level in the first AQL table.
● The result is a code letter (e.g., “K”).
Step 4: Determine the Sample Size
● Use the code letter in the second AQL table to find the required sample size.
Step 5: Check the Acceptance Limits
● Locate the AQL values for major and minor defects.
● Compare the number of detected defects against the acceptance limit.
● If the defect count exceeds the acceptance limit, the batch fails.
Example of AQL Application
Let’s assume:
● You are inspecting a lot of 5,000 products.
● You select General Inspection Level II.
● Your AQL settings are Major: 2.5 / Minor: 4.0.
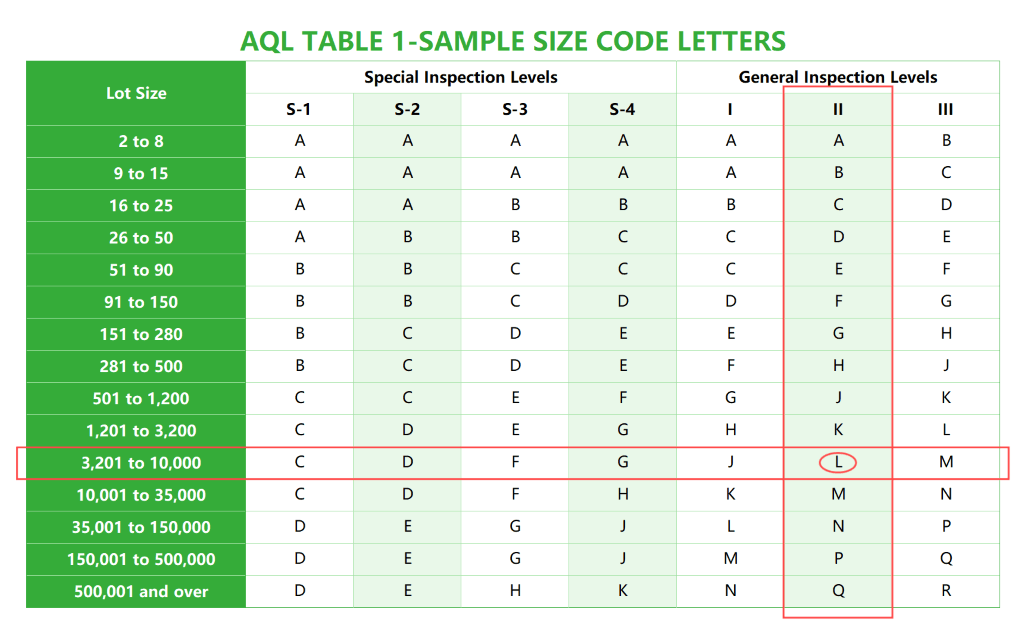
Step 1: Find the Sample Size Code Letter
● In the first AQL table, for a lot size of 3,201 to 10,000, General Level II corresponds to code letter “L”.
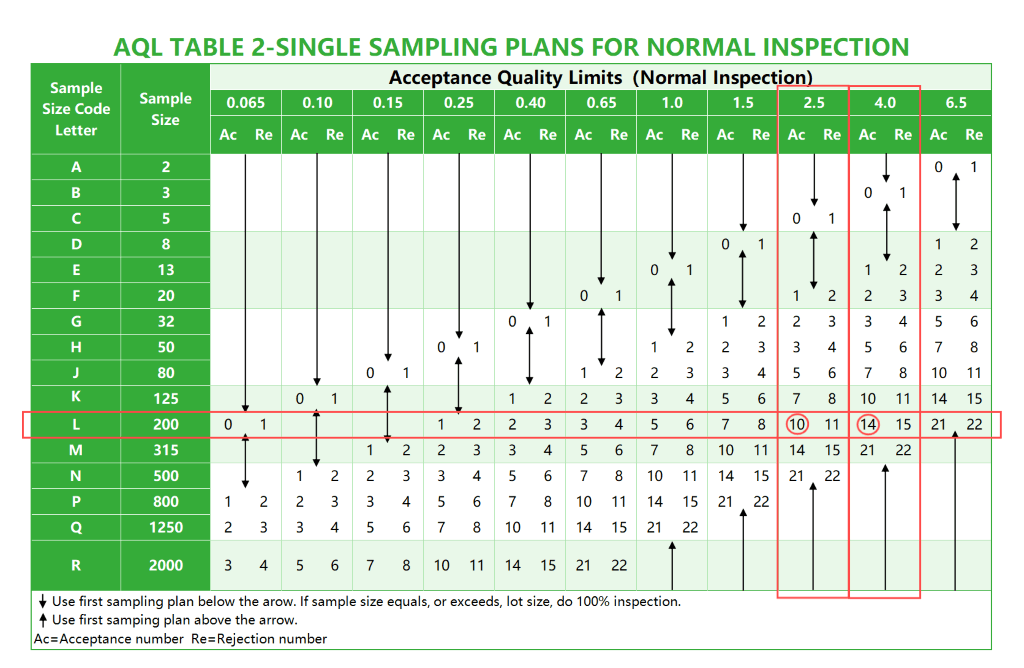
Step 2: Determine the Sample Size
● In the second AQL table, code letter “L” corresponds to a sample size of 200.
Step 3: Determine the Acceptance Limits
● For Major Defects (AQL 2.5) → Acceptance limit = 10 defects
● For Minor Defects (AQL 4.0) → Acceptance limit = 14 defects
Step 4: Evaluate the Inspection Results
After inspecting the 200 sampled units, compare the defect count with the acceptance limits:
● If the number of major defects is 10 or fewer and minor defects is 14 or fewer, the batch passes the inspection.
● If the number of major defects exceeds 10 or minor defects exceeds 14, the batch fails, and corrective actions may be required.
QCC SAMPLE REPORT
For sample reports or custom checklists, please contact us – we're here to assist you.

